Using Automator to Make Your Kindergarten Orientation have a Bigger Impact!
Thursday, May 1, 2014 by jethrojones
The Problem
Last Friday we had kindergarten orientation. Last year, we thought it would be fun to take pictures with the school mascot and share them with the families. The only problem is that we didn’t have a way to get the pictures printed and distributed to the families, so we took a bunch of pictures and they sat on the person’s camera and nothing was done. A great gesture, but not helpful in the end.This year, I was tasked with making sure the families got a picture of their student with our mascot. The picture would be on the bottom half of an 8.5x11“ piece of paper. On the top of the paper it said, ”Future Cougar, Class of 2027" and that was already printed out. So, I needed to get the picture on those papers.
The original idea was to print 2 pictures on 8.5x11" paper and then cut them out and tape or paste them on that piece of paper. I knew that we wouldn’t have enough time to cut all those pictures out.
The Solution
Here is what I wanted to do:- Since the papers were already printed, and just needed the picture, I could print right onto the paper that said “Future Cougar”.
- I created a Word document that had a top margin set to about 6" (which is about how much space the words took up).
- I would insert all (expected) 70 Kindergartner pictures in the Word document.
- I would then print them.
Another wrench that quickly messed things up is that printing pictures from a camera that takes high resolution pictures takes a long time on our computer, especially if it makes the Word document really big. So, I would also need to reduce the size of the pictures to something much smaller, so they wouldn’t create a bottleneck at the printing process.
The Automated Solution
Automator is an app that comes with every Apple computer, and it automates things you would do on your computer. It is pretty awesome.I already created the Word document. I already had a folder that I would put all the pictures in. I just needed to get them reduced in size and inserted into the Word document.
Automator takes care of that for me.

Here are the Automator steps:
- Get Selected Finder Items - This gets the Finder items that are selected in the frontmost finder window. I just selected the photos that I had taken.
- Scale Images - I needed the images smaller, but not too small I had to play around with this one, but I got it to work well at about 50% scaling.
- Move Finder Items - To not confuse myself, I had Automator move the pictures from the folder they were in to a folder in Dropbox called “Print these” which is shared with the office staff, where the pictures were printed. They did quality control and made sure all pictures printed correctly.
- Insert Content into Word Documents - This is where the magic happens! Automator takes care of the annoying mouse clicks and just inserts the pictures into the document. I chose the bottom of the document, so that they would be in the same order as they were taken.
Bonus
We took the pictures using the iPad. I had Camera Uploads turned on, so that when we took a picture, it almost instantly went to the camera uploads folder on Dropbox. That got it to my computer quickly. Using Hazel, I created a rule that watched the Camera Uploads folder for new files and moved them to a folder and then ran the Automator workflow on those files.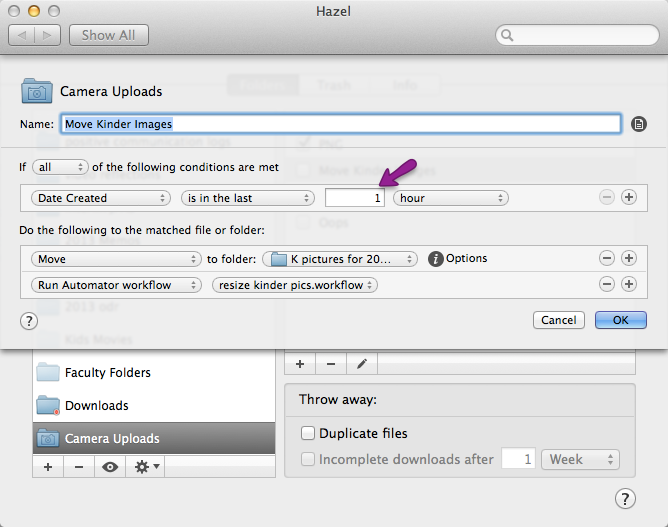
BAM!
Dropbox, Automator, and Hazel allowed me to take pictures on my iPad and by the time I got back to my office, they were in a Word document ready to review and print on pre-made stationary!Have a Good Life.


 Facebook/Jethro
 Linkedin/Jethro Jones
 Twitter/jethrojones
 YouTube/mrjoneseng
 Del.icio.us/jethrojones
 Wikipedia/mrjoneseng
 GMail/Jethro